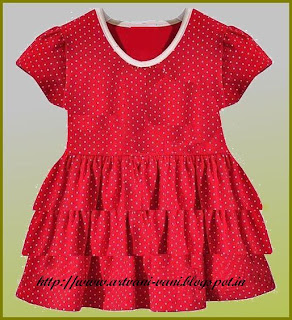
This frock has got 3 steps of ruffles or frills.One is attached to the waist line and the other two are attached to the skirt portion.Skirt portion is not visible and it will be covered with ruffles .Good material is used for bodice and ruffles and ordinary material can be used for the skirt.If the frock is stitched with sheer fabric it looks great if satin is used for the lining of the bodice and also for the skirt portion.
A-D = full length of the frock
A-C = waist length
A-B =¼ chest
From the points A, B, C and D draw perpendiculars for the line A-D.
On the perpendicular line at A Mark point E such that A-E= ½ shoulder + ½”.
On the perpendicular at B mark G such that B-G =¼ chest +1½”
On the perpendicular at C mark I such that C-I =¼ waist + 1½”.
On the perpendicular at D mark point K such that D-K =B-G + 3”.
From the point E drop a perpendicular for the line A-E.
Let this meet the line B-G at H.
Join E-H. On this line Mark p
oint F such that E-F =1”
On the same line mark T such that H-T = 1”
On the line A-E mark P such that A-P = neck width ⅟₁₂ chest +¼” or to taste.
On the line A-D mark R such that A-R = front neck depth=⅟₁₂ chest +1”.
On the same line mark Q Such that A-Q = back neck depth=1”
Shape Q-P and R-P.
Join P-F. Shape back and front armhole curves F-G and F-T-G as shown in the figure.
Join G-I. On this line Mark J such that J-I = ½”.
Join I-K. On this line Mark S such that S-K = ¾”
Shape D-S.
Cut the draft along the line Q-P- F –G-J-S-D.
Separate skirt from the bodice by cutting along the line C-J.
Sleeves
A-B=sleeve length + 2”
From A and B draw perpendiculars to line A-B
Mark D such that A-D = ¼chest+1½”
From point D drop a perpendicular. Let it meet perpendicular from B at the point C.
On D-C mark point E such that D-E= ⅟₁₂ chest + ¾”
Bisect the angle ADE by a line .Let it meet the line A-E at the point G.
Shape front and back of arm scye as shown .On line B-C mark point F such that C-F = ½”.
Join E-F
On this line mark k such that F-K = ½”
Join B-K as shown.
While cutting the fabric add ½” seam for the skit and the bodice along the curve C-J as shown in the figure2. Add extensions for the plackets (Right and left button stands) for the right and left bodice back along the line Q-C.
Open the fold of the skirt portion. Divide the skit portions (Front and back) in to 3 portions by drawing lines L-M-L and O-N-O parallel to the curve J-C-J. Measure each curve. Ruffles are sewn on these lines.
Bodice and ruffles or frills are cut from a good material. Skirt portion is cut with an ordinary material of the same colour as frills cover the skirt portion.
Width of the strip should be such that it covers the top seam of the frill which is just below. So the width of each strip should be equal to the distance between two lines + 1” seam for top and bottom of the strip +2” for overlapping.
Length of each strip should be equal to 2 to 2½ times the length of each curve X 2. This is for front and back of the skirt. More the length more will be the ruffles.
Stitching.
Bodice
Stay stitch the curves
Stitch plackets.
Join front and back of the bodice along the shoulder line. Finish neckline. Stitch sides. Attach sleeves.
Skirt.
Stitch sides matching the corresponding curves. Finish the hem.
Mark first curve by notches and others by pencil mark into haves and quarters.
Finish one long edge of the strip with narrow hem. It can also be finished by piping or lace edging. Stitch the short sides together. Mark the raw edge of the strip by notches into haves and quarters. Loosen sewing machine tension and stitch two rows of basting stitches. Lower stitch should be on seam line and the other should be near the raw edge.
There are 3 steps of frills in this design.
First attach ruffles on the last curve.
Pin the strip to the curve, right sides together and matching the marking or notches done to mark the quarters and halves. The finished edge of the strip should come towards the waist line and raw edge should face the hem of the skirt as shown in the figure. Working on one section at a time, grab both bobbin threads and start pulling until the ruffle length is the same as the garment between the 2 pins. Distribute the gathers evenly and secure them with pins at places. Secure the ruffles in place by running stitch. Finally machine stitch them together. This step can be avoided if you feel comfortable with sewing with pins coming in the way. Flip the ruffle to right side top stitch.
Follow the same procedure to stitch the ruffle to the middle curve.
Pin the ruffle to the waist line that is first curve , keeping right sides together and matching the markings. Here the finished edge of the ruffle should face the hem. The rest of the procedure is same as before. Attach the skirt with ruffles to the bodice


